Shopping guide for rear projection films
Find out in this article how to use a self-adhesive rear projection film, how to install it in just a few steps and how to buy it in the online-shop.
Table of contents
Rear projection films: Projection for multimedia events
Glass walls and large window surfaces can be found in many modern office and commercial buildings. In modern buildings, facades in particular are generously glazed in order to make use of as much daylight as possible. Shop windows, on the other hand, have been around for over a hundred years. Whereas they mainly contained static exhibits from the shop’s range, these glass surfaces can now be used as a projection surface for multimedia events, advertising videos and presentations.
Once applied to the glass pane, a self-adhesive rear projection film creates a large XXL multimedia screen with which you can spread your advertising message as effectively as possible using the latest technology. You can buy the innovative advertising film from us quickly and easily online.
Function: Presentation with commercial projectors
The multimedia event is realized in just a few steps – you don’t need more than a commercially available projector and our quality rear projection film.
Projector setting “mirrored playback function”
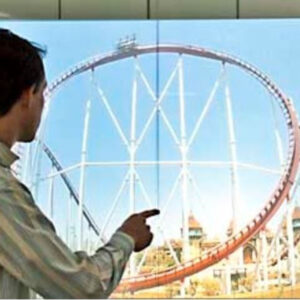
Commercially available projectors already have the most important technical requirement: Depending on the installation location, the image can be adjusted very flexibly on almost all projectors. You can turn it on its side, flip it over and mirror the entire display horizontally (setting “mirrored playback function”). It is precisely this mirror function that makes it possible to use your projector as a rear projection projector. The projector can illuminate the entire rear projection surface from behind, creating a huge screen.
Playback from unusual angles possible
Clinically attached to the floor and ceiling, the projector can also be mounted on the floor, wall or ceiling from unusual angles. The setting options on modern projectors for adjusting the projection allow distortions in the projection to be compensated for using on-board tools to compensate for trapezoidal and curvature effects. Online content can of course also be integrated into the projection surface.
Rear projection: Projector not visible behind the foil
The special charm of projection lies in the ability to hide the equipment completely behind the screen. Once placed behind the screen, the projector, cables and assembly parts are not visible to the viewer in front of the multimedia screen. This means that the media content can be presented in the audience area without any visible technical accessories.
Models: Milkglass white & transparent version
Discover film versions tailored to your needs for your new XXL multimedia canvas in our shop.
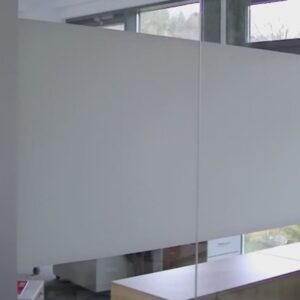
Milkglass look for high-contrast image reproduction
The white milkglass version offers the best conditions for projecting images with high contrast and bright colors. It is opaque without the possibility of being able to see through it. This property provides a practical additional function: an elegant privacy screen when the projector is not in use.
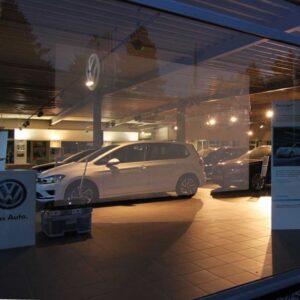
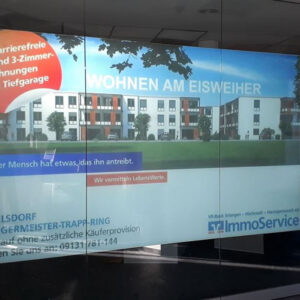
Transparent optics for visible shop window displays
The transparent version of our film has the advantage that exhibits can beter of the window pane even when there is no presentation taking place. The projected areas are clearly visible from the outside, even in bright surroundings during the day. The high-performance film can be bonded to both small and smaller surfaces.
💡 Tip: Order the frosted white version if you value high-contrast image reproduction. If you want exhibits to be visible when no projection is taking place, the transparent version is the right choice.
Installation: Step by step installation of the canvas
The canvas we offer is self-adhesive and can be installed and removed from most transparent surfaces.
- Clean the surface to be coated thoroughly and spray it completely with installation fluid.
- For window frames, cut the film so that the edges of the film are 1-2 mm away from the edge.
- Peel off the protective film on the backside of the foil and spray the adhesive side as well.
- Apply the wet adhesive film to the sprayed window pane and position it to the right position.
- Use a squeegee to smooth it out. Remove any bubbles, starting from the middle to the edges.
- Finally, all you have to do is to wipe the wet edges dry, and you’re done.
💡 Tip: You can order linear meters, cuttings and whole rolls. If you wish we cut the cancas to millimeters for you. You can simply specify your desired size in the comments field when ordering.
Summary: Rear projection films create XXL canvases
Turn your window pane into an XXL multimedia canvas. We’ve summarized all the advantages below.
Summary: All the advantages at a glance
Rear projection films are self-adhesive and can be installed to glass and window panes in just a few steps. They can be used on large and small surfaces and can therefore be adapted to the available space requirements. The presentation is carried out using commercially available projectors, which are positioned behind the screen and are therefore not visible. The frosted white version ensures high-contrast image reproduction. With the transparent version, exhibits are visible even when no projection is taking place.
Order: Rear projection film at online best price
You can buy millimeter cuttings, linear meters and whole rolls in our online-shop. No matter how you order – everything you shop online will be with you within 1-3 working days of receiving the order. If you wish, you can also have it delivered by express on the next working day, so that you can start your project immediately. Pay conveniently by invoice, credit card, PayPal, instant bank transfer or in advance.

 Adhesive films, rear projection film
 Adhesive films, rear projection film, plotter film
 Adhesive films, rear projection film
